StudentForms Account Instructions
Ready to complete your outstanding Financial Aid tasks online, with secure document upload from any device, and e-sign capabilities? So are we!
Providing the best student experience is important to us, and we heard your feedback loud and clear. You want to be able to complete financial aid processes on your own time, on the device of your preference.
We are proud to say that you will be able to:
- Complete financial aid forms on your phone, tablet, or computer.
- Securely upload documents from any device.
- E-sign documents—both you and your parents!
- Manage your financial aid tasks online
- Receive automated reminders about outstanding tasks and next steps
- You must submit a Free Application for Federal Student Aid (FAFSA) to SUNY Fredonia (school code 00284400). If you do not have a FAFSA on file, you cannot set up/link up your student account.
- Go to StudentForms.
- Enter your Fredonia username and password. If you are already logged into YOUR Connection portal, it may not ask you to do this.
- The first time you log in, it will ask you to fill out some information to link up your Fredonia student account to your FAFSA information. It will not ask you this for future log-in sessions. Fill out your:
- First Name (as listed on your FAFSA)
- Last Name (as listed on your FAFSA)
- Date of Birth (as listed on your FAFSA)
- Social Security Number (as listed on your FAFSA)
- Preferred email address (and confirm the email address)
- Phone Number if you would like to receive text messages for tasks you need to complete (Unfinished tasks may prevent your financial aid offer to disburse to your account)
- Click on "Register Account"
Some of the information in the register account screen is pre-populated. You may need to update the information to match your FAFSA exactly for the first and last name. If the information in the fields does not match your FAFSA or if there is not a FAFSA on file, you will receive an error message when trying to set up your account.
The Register Account screen should be similar to this: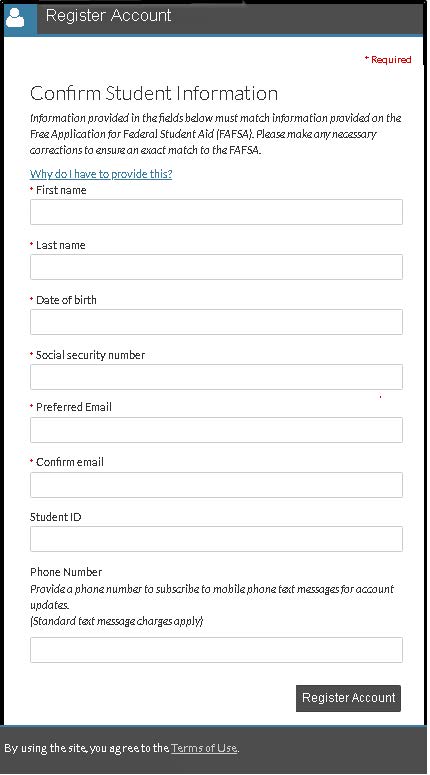
Some of your financial aid task may require a parent's signature. After you e-sign your form in StudentForms you must:
- Select which parent you would like to sign. You will only see the parent(s) listed on the FAFSA as an option. Parents must have passed the Social Security Administration check on the FAFSA to be eligible to e-sign. If at least one parent did not pass the check, you are automatically opted out of e-sign. See "What if I cannot e-sign my form?" for instructions.
- Enter your parent's email address. The email you listed must be different than your email address.
- Confirm your parent's email address.
- Click the "Send Request" button.
- Once the request has been sent to your parent, you are not able to edit your form unless you cancel the request. You can cancel or edit your request by using the "Cancel Request" buttons next to the e-signature request line on your StudentForms tasks.
Please note:
- If a parent did not pass the Social Security Administration check through the FAFSA (matching name, date of birth, and Social Security number), that parent cannot e-sign forms. If at least one parent did not pass the check, the student is automatically opted out of e-sign. See "What if I cannot e-sign my form?" for instructions.
- Parents cannot create an account or view documents for e-signature until the student sends the e-signature request. Only the parent the student sends the request to will be able to set up an account.
To create a parent account after receiving the e-signature request from the student:
- Click on the link in the e-signature request email from the student.
- Click on the "Create Account" button. Parents can only create one account per student. If they have multiple students, a separate account will need to be created for each student.
- Fill out the requested information (email address, username, and password). Please note that if you are a parent who must set up multiple accounts for different students, you must use a different username and email address for each account.
- Confirm your parental information from the FAFSA (your first name, last name, date of birth, and Social Security number). This information must match the student's FAFSA exactly for you to set up your account.
- Confirm your student's information from the FAFSA (their first name, last name, date of birth, and Social Security number). This information must also match the FAFSA exactly.
Once your account is created, you can review and e-sign the student's form. You can also say the form is not approved. If not approved, the student can make corrections, e-sign, and send a new e-signature request to the parent. If the parent chooses to opt out of e-sign, both the student and parent must physically sign the form. See "What if I cannot e-sign my form?" for instructions.
IMPORTANT: After you create your account, you will be sent an email to verify your email address. You must verify your email address within 24 hours of receiving the email.
If you (or your parent) are unable or do not want to use the e-signature option, you (or your parent) can opt out. Please note that if the parent chooses to opt out of e-sign, both the student and parent must physically sign the form. Students may also choose to opt back into e-sign at any time.
To submit the form with physical signatures instead of using the e-signature:
- On the review and sign page of the webform, you can choose to opt-out of e-sign.
- Once the e-sign option is no longer available, you (the student) will be presented with instructions. You must click the "Confirm" button to move forward.
- After you confirm, click on the "Download" button to download a copy of the form.
- Print and sign the document. If a parent signature is required, have your parent physically sign the form as well.
- Once the form has been printed, signed, and dated, scan or take a picture of your form. The file must be saved in a PDF, PNG, BMP, or JPG format to upload.
- Return to your task list on your StudentForms account.
- Click on the upload button to upload your document(s). Please make sure you upload all pages.
Prior to selecting the "Finish" button on your tasks, you may select the "Edit" button to edit documents on your account on the StudentForms website. If you sent an e-signature request to your parent for the form, you must cancel that request first by clicking the "Cancel Request" button next to the e-signature request on your task list.
If the task is a web form (a form you fill out on the website), you would just need to click the "Fill Out" button next to the task to make corrections. You will go through the signature process again after making corrections.
Please note that if you have selected the "Finish" button to submit all your tasks for review, you must contact the Fredonia Financial Aid Office at 716.673.3253 to request that we reject the document(s), so you will have the option to make edits again.
Students should only be locked out of their StudentForms account if they are locked out of their Fredonia eServices account.
Parents are locked of their StudentForms account after five unsuccessful login attempts. You must contact the Financial Aid Office at 716.673.3253 during regular business hours.